Monday, November 1, 2010

How to Center a 2-Way Draw Curtain Rod

via RepairWindowBlinds.com by Dave on 1/8/10

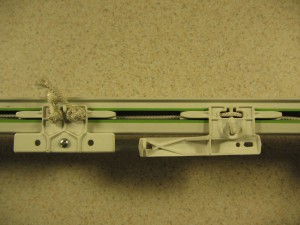
Once you restring your center draw curtain rod it should look something like this photo when seen from the back side. In the photo, the carrier on the left (the one with the knots) is what I call the primary or master carrier.

Center Draw Traverse Rod

Center Draw Traverse Rod Seen From the Back - Click to Enlarge

You will need to put the rod back up on the wall and re-hang the drapery or curtain on the rod before you proceed.

Positioning the Master Carrier

Pull on the draw cord to close the drape, the primary carrier will traverse until the drapery or curtain panel on that side is fully extended. If the rod was properly installed to match the width of the curtain, the carrier will be in the center of the rod.

Positioning the Secondary Carrier

To set the position of the secondary carrier, hold the pull cord tightly in one hand so that the primary carrier doesn't move and then slide the secondary carrier towards the center of the rod until it butts against the primary carrier.

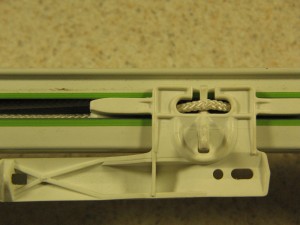
The secondary carrier has a small slot where the cord is exposed (see photo below)

Center Draw Traverse Rod - Secondary Carrier

Center Draw Traverse Rod - Secondary Carrier - Click to Enlarge


Pull the Loop

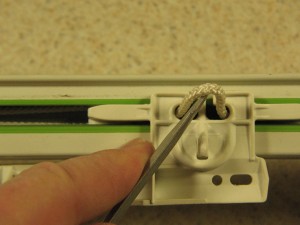
Using a small screwdriver, pull the exposed cord out to form a loop as seen below.

Curtain Rod Center Adjustment - Pull Out the Loop - Click to Enlarge

Curtain Rod Center Adjustment - Pull Out the Loop - Click to Enlarge


Anchor the Loop

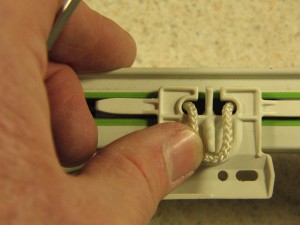
Now place the loop over the anchor point on the carrier.

The anchor point for the rod shown is a plastic tab located just below the cord slot. On some other brands of traverse rod the anchor point(s) will be small tabs located on either side of the cord slot - you'll know them when you see them. You only need to anchor the cord to one of those tabs. Which one you choose is up to you. I don't think it matters.

Traverse Rod Center Adjustment - Anchor the Loop - Click to Enlarge

Traverse Rod Center Adjustment - Anchor the Loop - Click to Enlarge


Snug it Up!

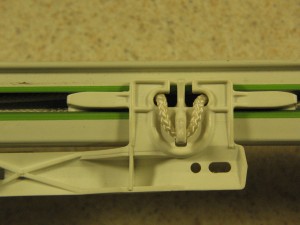
Finally, you pull on the draw cord until the cord loop is snug to the anchor point and you're done!

Now when you operate the pull cord, both sides should open and close in unison and they should come together neatly in the center every time.

Curtain Rod Center Adjustment - Snug it Up - Click to Enlarge

Curtain Rod Center Adjustment - Snug it Up - Click to Enlarge


Some Final Thoughts

As you can see, this whole process is pretty simple.

It is important to hold the pull cord so that the primary carrier doesn't move away from center while you are anchoring the cord to the secondary carrier. Of course, if something does go haywire, you can always disconnect the anchor point and start over.

With a little trial and error you'll have things up and running in no time.

As always, please leave a comment if you have any further questions. Have fun!
Blinds.com

Sunday, October 31, 2010

7 Tips for Accurate Measurements

If you want a professional installation, you must start by measuring like a professional. Dimensions can vary by several inches from window to window even though they appear to be the same size. Always measure every window!

via Install-Window-Blinds.com by blindsInstaller on 3/16/09

  1. Measure Every Window

If you want a professional installation, you must start by measuring like a professional. Dimensions can vary by several inches from window to window even though they appear to be the same size. Always measure every window!

  • Use the Right Measuring Tool
  • A tape with a wide blade (1" or more) is easy to work with because it is rigid enough to span the window without bending or kinking and it can stand up on it's own for an easy vertical measurement. If you have trouble reading the divisions on a tape you may want to consider one with a fractional blade or scale. A fractional scale reads directly in fractions of an inch making it easy to interpret the division marks. A laser measure is even easier to work with and very accurate.

  • Choose Your Window Treatment Before You Measure
  • Each type of window covering has it's own unique set of measuring requirements. None of it is rocket science, but you can't know what to do or what to look out for if you haven't decided which type of blind or shade you want to buy. Select the type of product that you want before you measure.

  • Check Each Dimension in (at least) 3 Places
  • Window opening dimensions often vary from side to side and top to bottom within the same window. As the installer, it is your job to identify the largest and smallest dimension in each direction. Depending upon your choice of blind or shade you will need this information to make an informed decision about which dimensions you should use when ordering.

  • Be Consistent When You Write Down Your Measurements - (part1)
  • It is the standard in the industry to record window covering dimensions as width followed by height. If you are such a rebel that you just can't conform to this standard, be sure to label your dimensions so you'll remember which is which when it comes time to place your order (if the retailer doesn't insist upon using the standard notation, you may want to consider using a different retailer).

  • Be Consistent When You Write Down Your Measurements - (part 2)
  • Use a measurement worksheet and label each window. When measuring a room with more than one window, go around the room in a clockwise direction (or whatever - the main thing is to be consistent). Label each window as you go around the room. For example, in the dining room you might label them as "din1", "din2", etc. Keep your worksheet where you can find it so you can use it as a reference to lay out the job for installation.

  • Do a Reality Check
  • Be sure to scan the completed worksheet for dimensions that seem out of place. For instance, if all of the windows in the breakfast nook measure out at approximately 36" x 48" except for one oddball at 36" x 45", you would probably want to check your work again.


    Replace the Cord Stop on Your Cell Shade

    Each brand of shade uses a slightly different style of stop, but they are all intended to connect the individual lift cords at one single tie-off point so that the shade goes up and down evenly and hangs level. The stop also prevents the small cords from being accidentally pulled back up inside the headrail.

    via RepairWindowBlinds.com by Dave on 5/27/10

    Did your dog or cat eat the tassel on the end of your cell shade pull cord?

    Broken or missing cord stops and tassels are a common problem in almost every home. Sometimes they have been damaged by a pet. More often they just get brittle with age and break. When this happens it is always unsightly and it can prevent the shade from working properly.

    The repair is inexpensive and something you can easily do for yourself.

    Each brand of shade uses a slightly different style of stop, but they are all intended to connect the individual lift cords at one single tie-off point so that the shade goes up and down evenly and hangs level. The stop also prevents the small cords from being accidentally pulled back up inside the headrail.

    Here is a good video about how to install a replacement cord stop assembly for a Hunter Douglas Duette cell shade. You may also want to watch the companion video about How to Replace a Broken Window Blind Cord.

    How to disassemble the old parts.

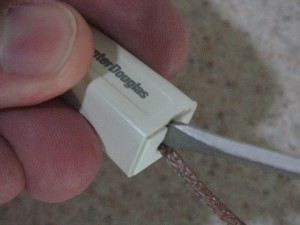
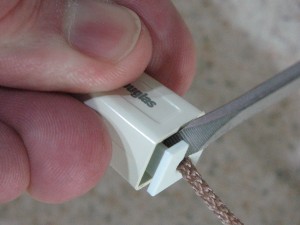
    Unless the old parts are so brittle as to be broken and useless, you may be able to take the old cord stop assembly apart and reuse whatever is salvageable. This isn't always as easy as you might think. After a few years in the sun, the old parts will often seem to be welded together. In theory, you should be able to pull them apart by holding the cover in one hand and pulling the heavy cord with the other hand. If that isn't working for you, then you will need to pry them apart. You can do that by inserting a small screwdriver into the slot and prying the pieces apart with a gentle levering action. Just be careful and don't stab yourself with the screwdriver.

    Hunter Douglas Cord Stop Disassembly - Step 1

    Insert a small screwdriver into the cord stop assembly Click to Enlarge

    Hunter Douglas Cord Stop Disassembly - Step 2

       Using a gentle levering action pry the pieces apart Click to Enlarge


    Tips for when you reassemble the cord stop.

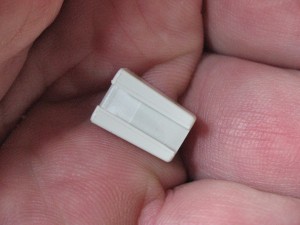
    • As the video shows, the narrow end of the equalizer goes towards the shade.


    Hunter Douglas Cord Stop Equalizer

       Hunter Douglas Cord Stop Equalizer - Click to Enlarge


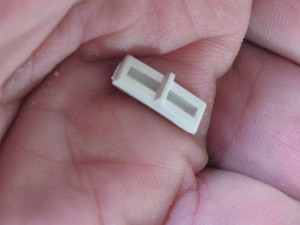
  • The wedge has a small ridge on one side. The side with the ridge goes against the lift cords and pinches them to keep them from slipping.
  •  

    Hunter Douglas Cord Stop Wedge

    Hunter Douglas Cord Stop Wedge - Click to Enlarge


  • Trim the heavier pull cord close to the knot before you insert it into the housing. If you leave too much excess cord, you will have trouble getting the cover to fit tightly on the housing.
  • Hunter Douglas Cord Stop Housing Untrimmed Knot

    Hunter Douglas Cord Stop Housing Untrimmed Knot Click to Enlarge

    Hunter Douglas Cord Stop Housing Trimmed Knot

       Hunter Douglas Cord Stop Housing Trimmed Knot Click to Enlarge


  • Adjust the shade to hang even and level before you assemble the cord stop housing.
  •  

  • Tie the tassel onto the other end of the fat pull cord and you're done.
  • Where to find replacement parts.

    If you need parts you can order them from the shade manufacturer or they are available online at the following websites:

    FixMyBlinds.com (Colorado Springs, CO) for Hunter Douglas Duette tassels and Hunter Douglas Duette Cord Stop Assemblies.

    Or you can try DiscountBlindParts.com (Chicago, IL area) for the Hunter Douglas Duette cord stop assembly. They call it part NP-42 - you'll find it about 2/3 of the way down the page.

    And finally there is BlindsParts.com (Tucson, AZ). This site sells the Hunter Douglas Duette tassel and cord stop assembly and some pull cord all in one kit.